Pineapple lovers, this one’s for you. If you’ve ever been torn between the sweet caramelized fruitiness of a pineapple upside-down cake and the rich creaminess of cheesecake, it’s time to stop choosing. The pineapple upside-down cheesecake brings both worlds together—no compromises, no regrets.
Why Pineapple Is the Star
Tart, juicy, and naturally sweet, pineapple adds a tropical punch to any dessert. But in this hybrid masterpiece, it does more than flavor—it transforms. Baked into a caramelized layer that crowns the cheesecake, the pineapple cuts through the richness and adds just enough acidity to balance every bite.
Not to mention, pineapple’s enzymes also aid digestion, making this decadent dessert surprisingly functional (well, sort of).
The History Behind Pineapple Desserts
Pineapple has been a popular dessert ingredient since the early 20th century, thanks in part to its exotic appeal and long shelf life in canned form. The original pineapple upside-down cake became a staple in American kitchens during the 1920s, when canned fruit and convenience recipes surged in popularity. This cheesecake variation honors that legacy while bringing it into the modern era—richer, creamier, and more indulgent than ever. By combining two retro desserts, the pineapple upside-down cheesecake strikes a perfect balance between nostalgia and innovation.
What Makes This Dessert Different
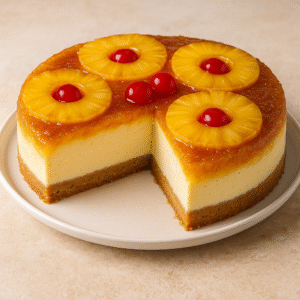
Traditional pineapple upside-down cakes are soft and spongey. Cheesecakes are dense, creamy, and cool. This dessert layers them:
-
Base layer: Graham cracker or vanilla wafer crust.
-
Middle: Cream cheese filling—smooth, tangy, slightly sweet.
-
Top: Pineapple rings caramelized in brown sugar and butter, sometimes with maraschino cherries for a retro flair.
The visual impact? Stunning. The flavor? Even better.
Step-by-Step: Making the Pineapple Upside-Down Cheesecake
Here’s a simplified roadmap:
-
Prep the pan. Line the bottom with pineapple slices and pour over melted butter + brown sugar.
-
Make the crust. Press crushed graham crackers or cookies into the base.
-
Blend the filling. Cream cheese, sugar, eggs, vanilla, and maybe a dash of pineapple juice.
-
Assemble and bake. Pour filling over the crust and pineapple layer. Bake until just set.
-
Chill completely. This is key for that perfect, sliceable texture.
-
Flip and reveal. Just like with the cake, the pineapple goes on top once inverted.
Pro Tips for Better Results
-
Use fresh pineapple if you can. It’s juicier, more vibrant, and less sugary than canned.
-
Bake in a springform pan lined with parchment—this makes the flip easier.
-
Let it chill overnight. This dessert gets better with time.
Variations to Try
Want to put your own spin on it? Here are a few ideas:
-
Add toasted coconut flakes for texture.
-
Mix crushed pineapple into the filling for double the flavor.
-
Try a macadamia nut crust instead of graham crackers for an island vibe.
Why It Ranks—And Why It Should Be on Your Table
The pineapple upside-down cheesecake doesn’t just taste incredible—it also looks impressive and satisfies a broad range of cravings. That’s why food bloggers, home bakers, and even restaurants are putting this on their menus and racking up clicks.
It’s also highly shareable on platforms like Pinterest and Instagram, thanks to its glossy top and photogenic structure. If you’re looking for a pineapple dessert that goes beyond the ordinary, this is it.
A Dessert That Balances Sweetness and Depth
What sets this dessert apart isn’t just its presentation—it’s the way flavors develop and evolve with each bite. The filling brings a gentle tang that plays against the deep caramel notes on top. That caramel, created from butter and brown sugar, adds a toasty richness that lingers. Meanwhile, the crust introduces a slightly salty undertone, grounding the sweetness and giving the whole thing structure. It’s easy for layered desserts to feel disjointed, but here, each element is doing its job without overpowering the rest. The interplay of acidic brightness, creamy density, and rich sweetness creates a full-bodied experience that goes beyond a sugar rush. Whether you’re serving it at a summer cookout or a holiday dinner, this dessert earns its spot—not just because it looks good, but because it delivers real, complex flavor in a familiar form.
Presentation That Impresses Every Time
This dessert doesn’t just taste good—it knows how to show up. When inverted onto a platter, the glossy fruit layer becomes a built-in decoration that needs no extra fuss. The rings and cherries create a natural pattern that catches the light and draws attention instantly. For gatherings, it offers a dramatic reveal moment as the pan is lifted, showcasing a dessert that looks far more complicated than it is. You can serve it chilled for a firm, elegant texture or let it sit at room temperature for a softer, creamier bite. Either way, it slices cleanly, holding its shape while delivering visual appeal on the plate. Add a dollop of whipped cream or a scoop of vanilla bean ice cream to each serving for contrast, or sprinkle toasted nuts for a bit of crunch. However you present it, this dessert has an undeniable wow factor built right in—no garnish required.
Make-Ahead Friendly and Built to Last
One of the underrated advantages of this dessert is how well it holds up over time. Unlike baked goods that dry out or custards that separate, this one actually improves after a night in the fridge. The flavors meld, the structure firms up, and slicing becomes cleaner and easier. This makes it a dream for hosts and planners—no last-minute scrambling needed. You can bake it a day or two in advance, chill it in the pan, and then flip it just before serving. It also stores beautifully; simply cover it tightly and keep it refrigerated for up to four or five days. If you’re making it for a smaller group, individual slices can even be wrapped and frozen for later. When thawed in the fridge overnight, it’s nearly indistinguishable from fresh. That kind of flexibility makes it perfect not only for parties and holidays, but also for when you just want a luxurious treat waiting in your fridge.
Final Bite
This isn’t just another dessert—it’s a showstopper. By combining the familiar comfort of cheesecake with the nostalgic zing of pineapple upside-down cake, you get a recipe that’s both fresh and timeless.